How do you test a coil?
Irrigation expert John Kidson details what you need to do to find out if a coil you use on your irrigation system needs to be replaced.
Article from Greenkeeper Magazine
During recent training workshops I was running, I was repeatedly asked: ‘How do you test a coil?’ Here’s how.
What you’ll need
• A multimeter set to Ohms (Ω) – logo reminds me of a pair of headphones
• The solenoid coil in question (make sure it’s disconnected!)
Step-by-step check
• Power off and isolate: Always disconnect power from the coil first. Make sure it’s completely unplugged from the controller or system wiring.
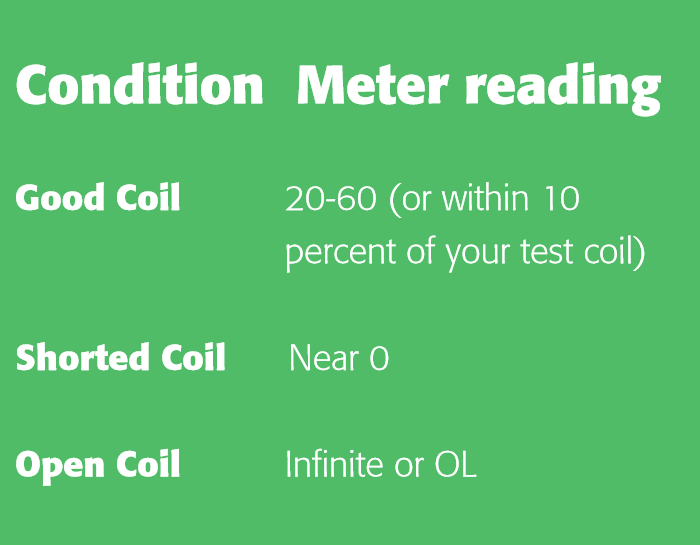
• Set up your multimeter: Switch your meter to the Ω setting. Typically, irrigation coils measure between 20 and 60 Ω, but double-check the coil specs if you have them handy, or better yet, keep a new, unused coil in your toolkit as a quick reference each time you test.
• Measure coil resistance: Put each multimeter probe onto the coil wires, one probe per wire. A healthy coil should read around 20-60 Ω or within 10 percent of your reference coil, a short-circuited coil will be close to 0 Ω, indicating it’s toast and it’s time to swap it out, and an open-circuited coil will result in your meter showing infinite (OL). A replacement will be needed.
Personal tip
Always carry spare coils in your tool kit. These things never fail at a convenient time, and you can always use them as a baseline for a good reading. Personally, I work on a 10 percent tolerance.